
Sep 9, 2026Tier-1 Success Stories
PA6-GF10 Warpage Correction: 1.8 mm Injection Molding Case Study
How JST Mould corrected 1.8 mm warpage in a PA6-(GF10+M20) automotive part using mold compensation, DOE validation, feeler-gauge checks and CMM inspection.
How We Corrected 1.8 mm Warpage in a PA6-(GF10+M20) Molded Part
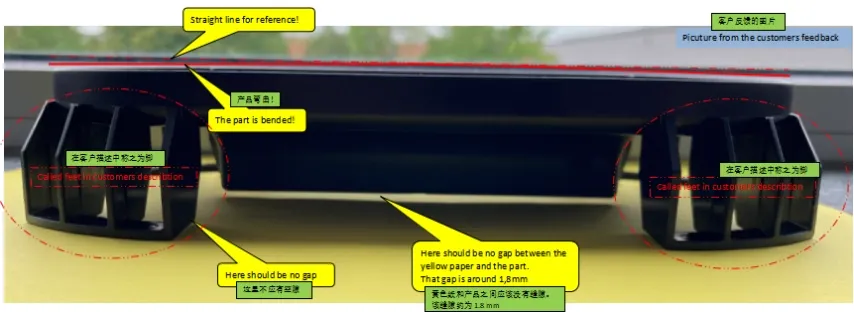
A European Tier-1 supplier asked us to resolve a warpage problem found during T1 validation of an automotive molded part made from PA6-(GF10+M20). After cooling, the part showed approximately 1.8 mm of warpage, preventing the four critical support points from achieving the required mating condition.
The component was intended for a vehicle program of a well-known German automotive brand. Because the project is covered by NDA, customer-identifying information, the vehicle brand, and the full part geometry are not disclosed in this case study.
The final solution did not come from a single molding-parameter change. We first evaluated the processing window, then introduced controlled inverse compensation into the mold geometry, re-machined the relevant steel, and validated the result through DOE trials, functional feeler-gauge checks, and three-sample CMM inspection.
Project Snapshot
Item | Verified Project Data |
|---|---|
Customer | European Tier-1 supplier |
Application | Automotive component |
Resin | PA6-(GF10+M20) |
Initial issue | Approx. 1.8 mm warpage after T1 |
Functional concern | Contact condition at four support points |
Main mold correction | Controlled inverse compensation |
Maximum local compensation | 0.28 mm |
Controlled transition | 0.063 mm |
Validation | DOE, 0.1 mm feeler gauge, three-sample CMM |
Final status | Customer released the tool for shipment |
Customer identity, vehicle program details, part number, and full geometry are withheld under NDA.
The T1 Problem: 1.8 mm Warpage Affected Assembly Fit
The T1 parts showed a repeatable deformation after cooling. The issue was not simply cosmetic: the warpage changed the position of the four support points that were important to the part's final mating condition.
The measured deviation was approximately 1.8 mm in the affected area.
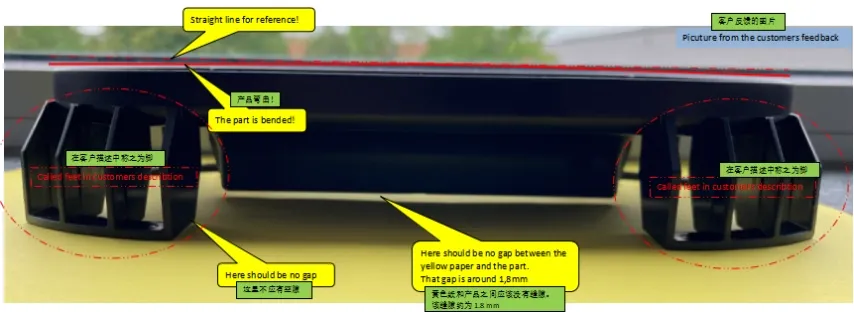
T1 inspection identified approximately 1.8 mm of warpage at the critical mating area.
At this stage, the first question was whether the problem could be corrected through molding conditions alone or whether the mold geometry itself had to be modified.
Adjusting process parameters is faster and does not require steel modification, but it only works when the deformation can be brought into a stable and repeatable window without creating other quality or cycle-time problems.
Why Process Adjustment Alone Was Not Enough
Before modifying the mold, we reviewed several molding conditions through structured trial settings.
The DOE covered factors such as mold temperature, fill time, cooling time, holding pressure, holding time, and cycle time. Local thermal conditions were also reviewed because the mold included a beryllium-copper insert and a dedicated cooling circuit.
The trials helped us understand how much of the deformation could be influenced by the process.
However, the remaining warpage trend could not be removed reliably through parameter adjustment alone. Continuing to change the molding conditions would have risked creating a narrow process window without addressing the underlying geometry-related deformation.
At that point, the engineering decision was to correct the mold geometry itself.
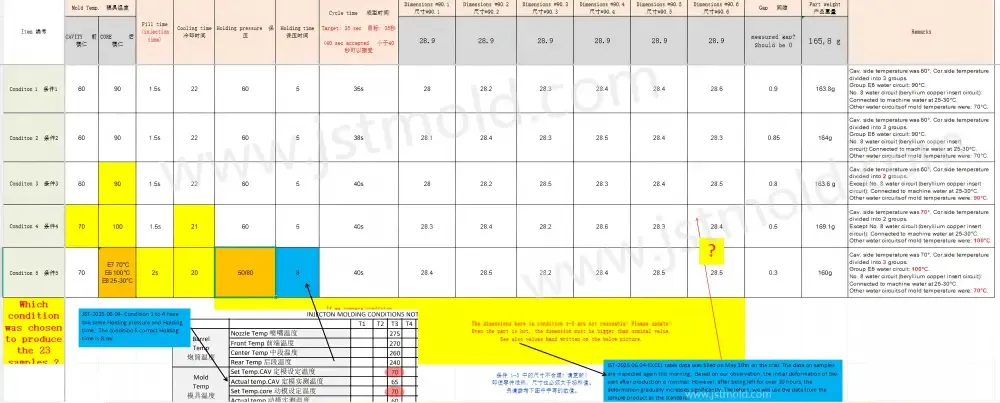
Multiple molding conditions were evaluated before committing to a permanent mold geometry correction.
Mold Pre-Deformation: Applying Controlled Inverse Compensation
A common misunderstanding in warpage correction is to assume that the amount of part deformation should be copied directly into the mold as an equal and opposite offset.
That is not how we approached this project.
The part showed approximately 1.8 mm of warpage, but the maximum local mold compensation applied was only 0.28 mm.
The reason is that molded-part deformation and steel correction do not have a simple 1:1 relationship. The final part shape is influenced by molded geometry, material behavior, cooling, local stiffness, shrinkage, and post-molding relaxation.
Instead of applying a uniform offset, we introduced the compensation only where it was required and transitioned it gradually into the surrounding geometry.
The controlled transition used in this project was 0.063 mm.
This avoided creating an abrupt step or transferring the problem into a neighboring area.
Technical note: A 1.8 mm part warpage did not require 1.8 mm of mold correction. The compensation value was based on the measured deformation pattern and the actual behavior of the molded structure.
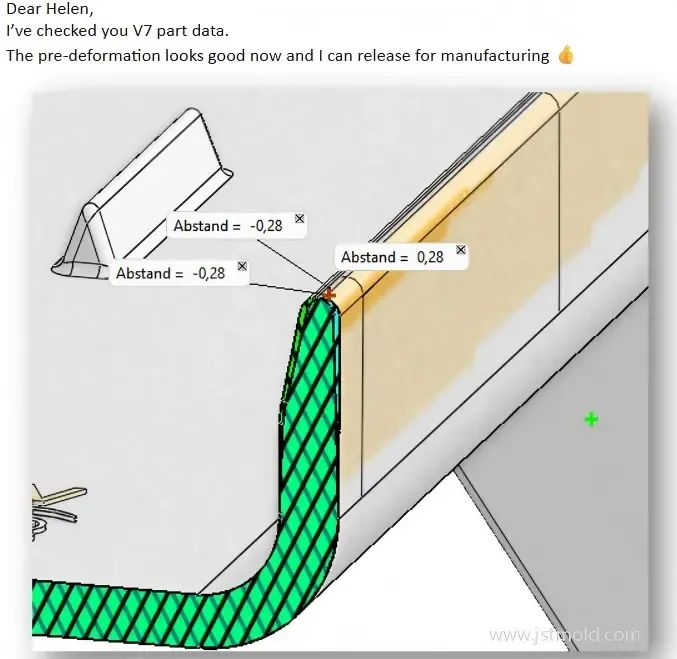
Local inverse compensation was introduced based on the measured T1 deformation pattern.
From CAD Compensation to Steel Modification
Once the compensation geometry was confirmed, the correction moved from CAD into the mold.
The affected insert was re-machined according to the revised geometry. After machining, the insert was checked and the mold was reassembled for the next validation trial.
This part of the process is important because warpage correction is not only a simulation or CAD exercise. The proposed compensation has to be transferred accurately into the actual steel while maintaining the intended transition between corrected and unchanged areas.
The mold was then prepared for another trial under controlled conditions.
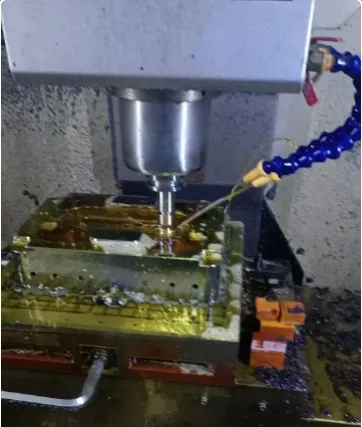
The affected mold insert was re-machined and reassembled after the compensation geometry was confirmed.
Thermal and Process Validation After the Mold Correction
The geometry correction addressed the persistent deformation trend, but process stability still had to be confirmed.
The mold used a beryllium-copper insert as part of the local thermal-control strategy. During DOE validation, the BeCu circuit was connected to machine water at approximately 25–30°C, while the remaining mold-temperature conditions were evaluated separately.
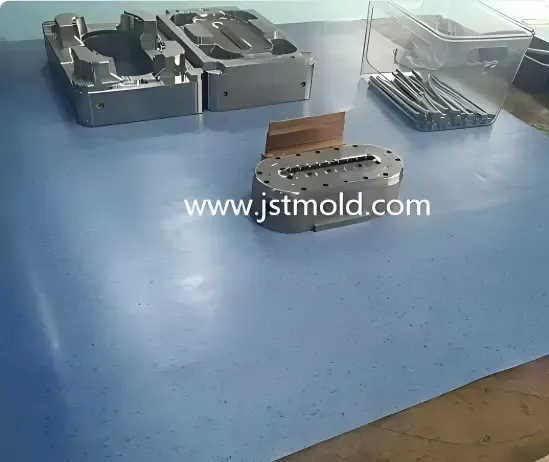
A BeCu insert and controlled cooling circuit supported thermal stability during validation.
The team also monitored cooling, holding conditions, and cycle time. The project target was to maintain an acceptable molding cycle below approximately 40 seconds while verifying the corrected part condition.
The BeCu insert and local cooling circuit were therefore part of the overall thermal-control strategy, but they were not treated as a substitute for the geometry correction.
The final result depended on both correcting the stable geometric bias in the mold and confirming that the result remained repeatable within a practical molding window.
Validation: Functional Fit and Three-Sample CMM Inspection
We did not rely on a single measurement method to judge the correction.
Two different types of verification were used: a functional contact check and dimensional inspection.
Functional Check at the Four Support Points
After the corrective mold modification, the part was checked at the four critical support positions using a 0.1 mm feeler gauge.
The purpose of this check was to verify the required contact condition at those support points.
This should not be interpreted as saying that the final total warpage was 0.1 mm. The feeler gauge was used as a functional verification method at the specific mating locations.
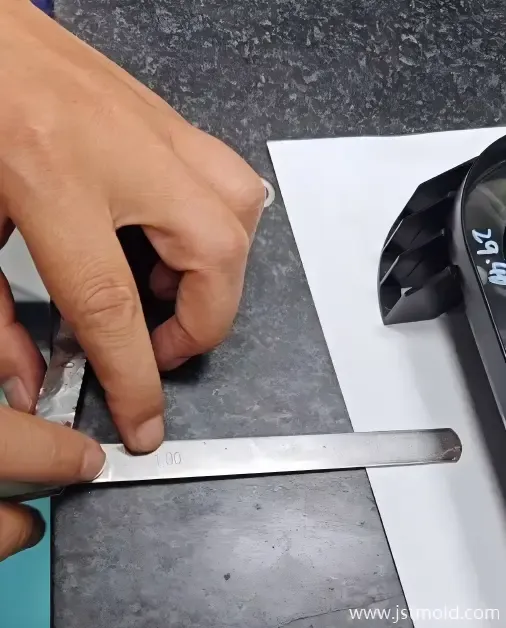
A 0.1 mm feeler gauge was used to verify the contact condition at the four critical support points.
Three-Sample CMM Verification
Three validation samples were also inspected by CMM.
Validation Sample | Measured Flatness 1 | Measured Flatness 2 |
|---|---|---|
Sample 1 | 0.079 mm | 0.166 mm |
Sample 2 | 0.058 mm | 0.162 mm |
Sample 3 | 0.047 mm | 0.154 mm |
For NDA reasons, the original CMM reports and complete part geometry are not published here.
This combination of functional checking and dimensional measurement gave a clearer picture than relying on a single headline number.
Result: Customer Release and Tool Shipment
After the mold correction and validation work were completed, the samples and inspection information were submitted to the customer for review.
The customer subsequently released the tool for shipment and instructed us to prepare the mold for sea freight.
The mold was packed at JST and later delivered into the export logistics process.
This was the point at which the correction phase moved from engineering validation into final project delivery.
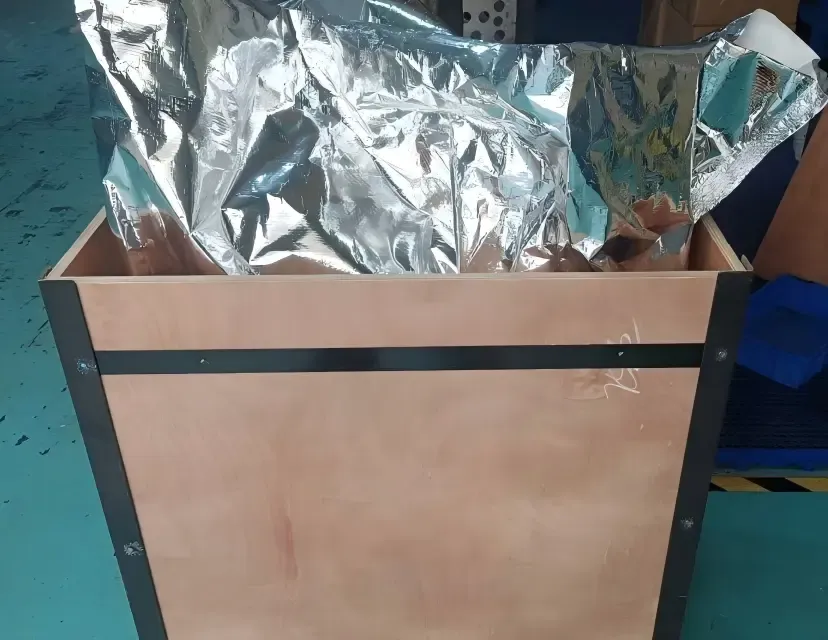
After validation and customer release, the mold was packed at JST for overseas shipment.
What This Case Shows About Warpage Correction
Process tuning and mold correction are not the same thing
Molding parameters should always be checked before modifying steel. In some cases, process optimization alone can solve the problem.
But when the same deformation trend remains after reasonable process adjustment, continuing to chase parameters may only create an unstable process window. At that point, the mold geometry may need to be reviewed.
Part warpage and mold compensation are not a 1:1 relationship
The part in this case showed approximately 1.8 mm of warpage, while the maximum local mold compensation was 0.28 mm.
That ratio is specific to this project and should not be used as a general rule.
Effective compensation has to be based on the actual deformation pattern, part structure, material behavior, and molding conditions.
Functional and dimensional validation should be used together
A CMM report can quantify geometry, but it does not always answer whether a part performs correctly in its intended mating condition.
Likewise, a feeler-gauge or assembly check can confirm function but does not replace dimensional inspection.
Using both methods gave us a more reliable basis for the final release decision.
FAQ
What causes warpage in PA6 filled injection-molded parts?
Warpage usually results from non-uniform shrinkage and stress during cooling. Part geometry, local stiffness, material orientation, mold-temperature balance, cooling conditions, packing, and other molding parameters can all influence the final shape.
For filled PA6 materials, the deformation pattern may also be strongly affected by how the material behaves through different sections of the part.
Can injection-molding warpage be fixed only by changing process parameters?
Sometimes. If the warpage is mainly caused by an unstable molding condition, changes to mold temperature, cooling, packing, holding time, or other parameters may improve the result.
However, when a repeatable deformation trend remains after a reasonable process study, a mold-geometry correction may be required.
What is mold pre-deformation or inverse compensation?
Mold pre-deformation means intentionally modifying selected areas of the mold geometry in the opposite direction of the expected molded-part deformation.
The purpose is not to distort the part intentionally, but to allow the molded part to relax closer to the required final geometry after cooling.
How much compensation should be added to correct warpage?
There is no universal ratio.
In this project, approximately 1.8 mm of part warpage was corrected using a maximum local mold compensation of 0.28 mm, together with a controlled transition.
Those values were specific to this part and should not be applied as a general formula.
How should a warpage correction be validated?
A robust validation should combine repeatable molding conditions with both functional and dimensional checks.
Depending on the part, this may include assembly/contact verification, feeler-gauge checks, CMM inspection, multiple validation samples, and final customer review.
The goal is not simply to obtain one good sample, but to confirm that the correction works consistently under a practical molding condition.
Facing a Warpage Problem That Process Tuning Hasn't Solved?
If a molded part continues to warp after reasonable process optimization, the next step may require reviewing the mold geometry, cooling strategy, and actual deformation pattern together.
JST Mould can review your trial data and mold condition before recommending an appropriate corrective approach.